Route VeloFill through LiteLLM with Gemma 3
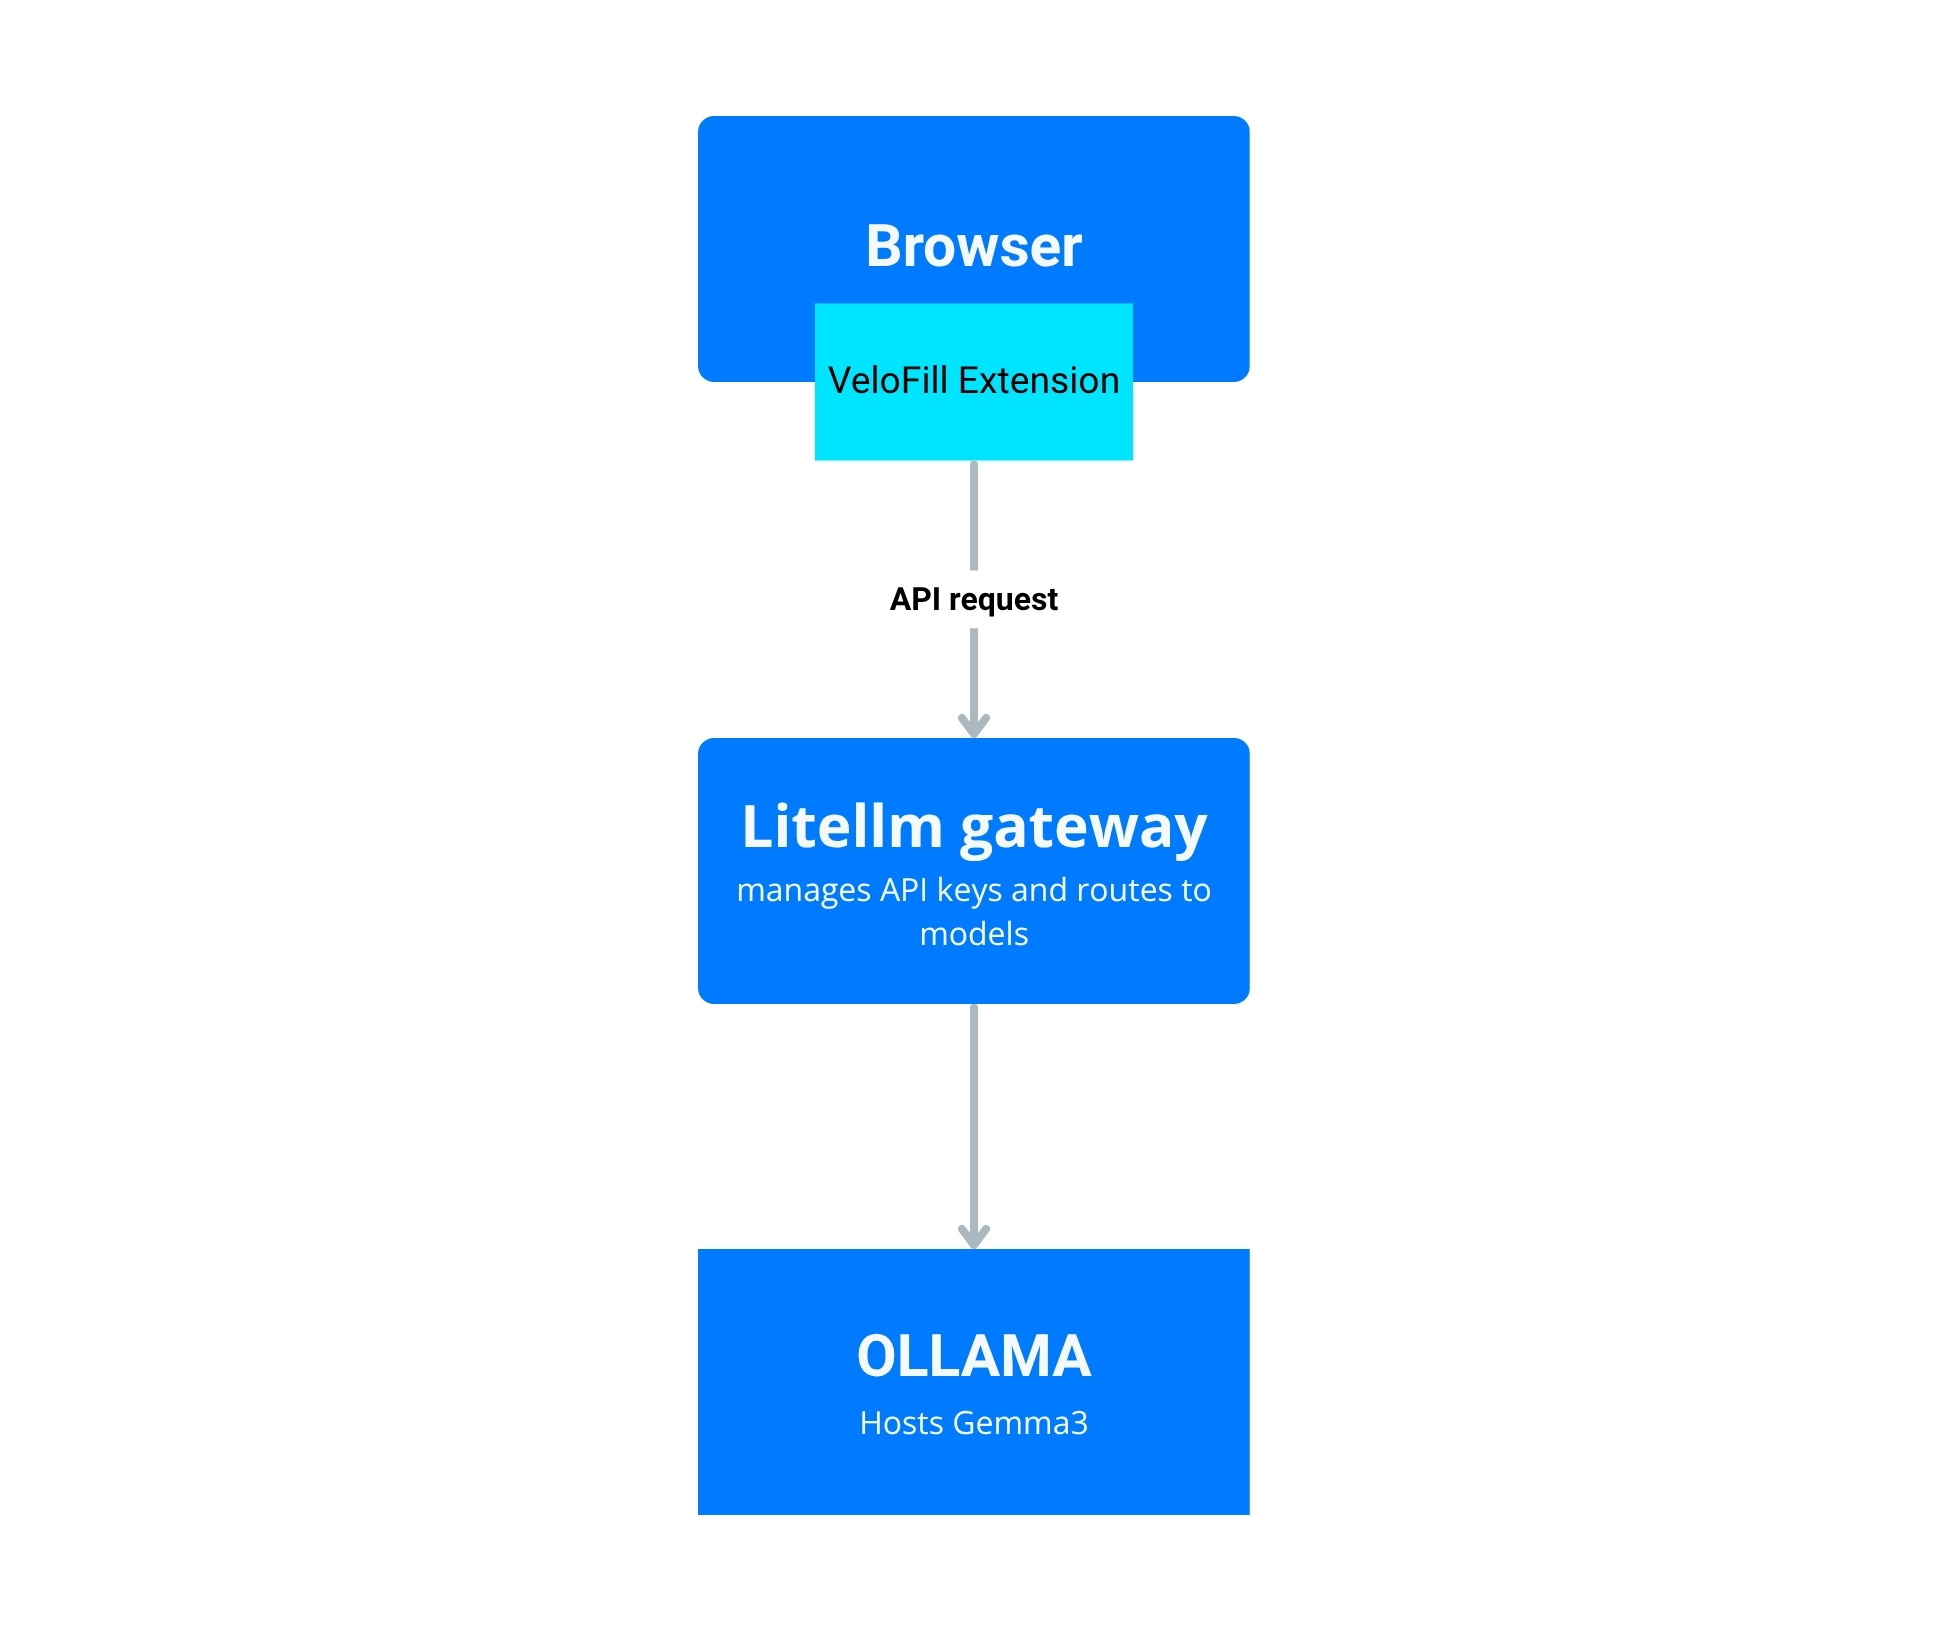
Proxy Gemma 3 behind LiteLLM to enforce API keys, capture logs, and fan out to additional local models without reconfiguring VeloFill.

Before you begin: This guide is for users who want to manage multiple models or have advanced security and logging needs. For a simpler, direct connection to Ollama, see our article: Run VeloFill with Ollama and Gemma 3.
What is Gemma 3?
Gemma 3 is the latest family of open-weight models from Google. It is designed for a new generation of AI applications that require a balance of high performance and responsible design. The models are available in various sizes, making them suitable for tasks ranging from complex reasoning to fast, responsive chat. For more details, you can refer to the official Gemma 3 documentation.
Why add LiteLLM to your VeloFill stack
LiteLLM gives you one OpenAI-compatible gateway that can front multiple providers. By putting it in front of Ollama and Gemma 3 you can standardize auth, logging, and rate limits—without touching the VeloFill configuration again when you add new models.
A few of the key benefits include:
- Centralized Control: Manage a growing list of local or cloud-based models without ever needing to reconfigure the VeloFill extension. This simplifies maintenance and lets you experiment with new models on the fly.
- Cost and Usage Tracking: LiteLLM can track spending and usage across different models and providers. This is a powerful feature for managing budgets, especially if you mix local models with paid APIs.
Prerequisites
- VeloFill extension installed and ready to point at a custom endpoint
- Ollama running with
gemma3:9b(or your preferred Gemma 3 tag) already pulled - Hardware for Gemma 3: Running the
gemma3:9bmodel requires a GPU with at least 9 GB of VRAM. For full-precision, this can go up to 28 GB. Consumer-grade cards like an NVIDIA RTX 3090 or 4090 are recommended. Using quantized versions of the model can significantly reduce VRAM requirements. - Python 3.9+ available on the server hosting LiteLLM
- Optional: Redis or PostgreSQL if you plan to enable LiteLLM’s advanced caching or analytics features. Consult the LiteLLM documentation for setup, as this is beyond the scope of this article.
Step 1: install and configure LiteLLM
Option A: Direct Python installation
- Install LiteLLM (using a virtual environment is recommended to avoid conflicts with other Python projects):
pip install "litellm[proxy]" - Create a configuration file,
litellm-config.yaml:model_list: - model_name: gemma3-local litellm_params: model: gemma3:9b api_base: http://127.0.0.1:11434 api_key: "" stream: true general_settings: # Choose a port that fits your network rules proxy_port: 4000 telemetry: false server_settings: # Enforce a default max tokens so requests stay snappy default_max_tokens: 2048 - Launch the proxy. This command will occupy your terminal; run it in a separate session or as a background process (
litellm ... &):litellm --config litellm-config.yaml - Confirm the endpoint is live by curling it:
curl -X POST http://127.0.0.1:4000/v1/chat/completions \
  -H "Content-Type: application/json" \
  -d '{"model":"gemma3-local","messages":[{"role":"user","content":"Hello from VeloFill"}]}'
Option B: Docker Compose deployment
For a more production-ready setup, use Docker Compose to run both LiteLLM and Ollama together:
-
Create a
docker-compose.ymlfile:version: '3.8' services: ollama: image: ollama/ollama:latest container_name: ollama ports: - "11434:11434" volumes: - ollama_data:/root/.ollama restart: unless-stopped environment: - OLLAMA_HOST=0.0.0.0 litellm: image: ghcr.io/berriai/litellm:main-latest container_name: litellm ports: - "4000:4000" volumes: - ./litellm-config.yaml:/app/config.yaml - litellm_keys:/app/keys environment: - LITELLM_CONFIG_FILE=/app/config.yaml - LITELLM_MASTER_KEY=your-master-key-here depends_on: - ollama restart: unless-stopped command: ["--config", "/app/config.yaml", "--port", "4000"] volumes: ollama_data: litellm_keys: -
Create the same
litellm-config.yamlfile (adjust theapi_baseto use the Docker network):model_list: - model_name: gemma3-local litellm_params: model: gemma3:9b api_base: http://ollama:11434 api_key: "" stream: true general_settings: proxy_port: 4000 telemetry: false server_settings: default_max_tokens: 2048 -
Start the stack:
docker-compose up -d -
Pull the Gemma 3 model into Ollama:
docker exec ollama ollama pull gemma3:9b -
Test the endpoint:
curl -X POST http://127.0.0.1:4000/v1/chat/completions \
  -H "Content-Type: application/json" \
  -H "Authorization: Bearer your-master-key-here" \
  -d '{"model":"gemma3-local","messages":[{"role":"user","content":"Hello from VeloFill"}]}'
Note: This command uses the
LITELLM_MASTER_KEYfor the initial test. Step 2 will cover how to create more secure, temporary keys for connecting VeloFill.
Step 2: Lock down access with an API key
LiteLLM can manage keys out of the box. When you start the proxy with a master_key (as in the Docker Compose example), key management is enabled.
- Generate a key:
litellm keys generate --models gemma3-local - Copy the key value returned by the command. This is what you will paste into the VeloFill options screen.
- By default, keys are stored in a local file (
litellm_keys.json). For more advanced configurations, you can set up a database in thekey_managementsection of your config file. - If you need per-key limits (like a budget or duration), you can add them as flags to the
generatecommand (e.g.,--max_budget 5or--duration 30d).
Step 3: Wire VeloFill into LiteLLM
- Open Options → LLM Provider in VeloFill.
- Choose OpenAI-compatible / Custom endpoint.
- Set the endpoint URL to
http://127.0.0.1:4000/v1(or the host where LiteLLM runs). - Paste the LiteLLM API key you generated earlier into the API Key field.
- Enter
gemma3-localas the model ID. - Save, then trigger a test autofill. You should see the request land in the LiteLLM logs.
Add routing rules for more models (optional)
- Introduce additional entries in
model_listpointing to other Ollama models, cloud providers, or inference endpoints. - Use LiteLLM’s
router_settingsto create fallbacks (for example, shift togemma3:4bif the 9B model is saturated). - Enable
logging: trueon the server settings to send structured logs to your SIEM.
Troubleshooting
- 401 Unauthorized: Regenerate a LiteLLM key and make sure it is copied correctly into VeloFill.
- Upstream timeout: Check whether Ollama is saturating CPU/GPU; lower
default_max_tokensor scale the hardware. - Mismatched model name: The
modelin the VeloFill UI must match themodel_namefrom your LiteLLM config. - SSL requirements: Terminate TLS at a reverse proxy (Caddy, Nginx) in front of LiteLLM if browsers or policies demand HTTPS.
What’s next
- Combine LiteLLM analytics with your VeloFill usage logs to spot high-value workflows.
- Layer approvals or workflows that require elevated prompts before hitting Gemma 3.
- Pair with Run VeloFill with Ollama and Gemma 3 for a fully local stack that still feels seamless to end users.
Need a guided walkthrough?
Our team can help you connect VeloFill to your workflows, secure API keys, and roll out best practices.


